This Article Applies to:
Archer C1200 , Archer C5400 , Archer A2600 , Archer AX55 , Archer C4 , Archer C5200 , Archer AX53 , Archer C5 , Archer AX10 , Archer C2 , Archer AX51 , Archer AX96 , Archer A2200 , Archer C6U , TL-WR1043N( V5 ) , Archer C80 , Archer AXE95 , Archer C8 , Archer AX10000 , Archer C3150 , Archer C9 , Archer AX50 , Archer C6 , Archer C7 , Archer AX90 , Archer AX6000 , Archer C5400X , Archer C25 , Archer C24 , Archer A20 , Archer A64 , Archer C60 , Archer C2600 , Archer A1200 , Archer C21 , Archer C20 , Archer C64 , Archer AX1800 , Archer AX206 , Archer C59 , Archer C58 , Archer AX4200 , Archer C3200 , Archer C900 , Archer A2 , Archer AX75 , Archer AX4400 , Archer C3000 , Archer AX73 , Archer C50 , Archer A10 , Archer A54 , Archer AX4800 , Archer C50 , Archer C1900 , Archer C55 , Archer C54 , Archer A2300 , Archer AXE75 , Archer A6 , Archer A7 , Archer AX72 , Archer AXE200 Omni , Archer A5 , Archer GX90 , Archer A8 , Archer A9 , Archer AX68 , Archer C2300 , Archer AX5300 , Archer AX23 , Archer AX20 , Archer C3150 V2 , Archer C4000 , Archer AX21 , Archer A3000 , Archer C2700 , Archer AXE300 , Archer AX1500 , Archer C90 , Archer AX60 , Archer AX11000 , Archer AX3200 , Archer AX3000
1. Log in to the web-based interface of the router. If you don’t know how to do that, please refer to
How do I log into the web-based Utility (Management Page) of TP-Link wireless router?
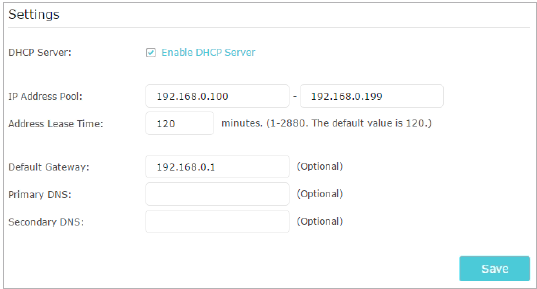
2. Go to Advanced > Network > DHCP Server .
To specify the IP address that the router assigns:
1) Tick the Enable DHCP Server checkbox.
2) Enter the starting and ending IP addresses in the IP Address Pool .
Enter other parameters if the ISP offers. The Default Gateway is automatically filled in and is the same as the LAN IP address of the router.
4) Click Save .
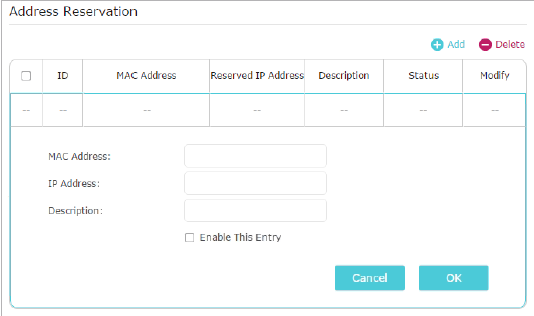
To reserve an IP address for a specified client device:
1) Click Add in the Address Reservation section.
Click View Existing Devices or enter the MAC address of the client device.
Enter the IP address to reserve for the client device.
Enter the Description for this entry.
Tick the Enable This Entry checkbox and click OK .
Get to know more details of each function and configuration please go to Download Center to download the manual of your product.
Esta FAQ é útil?
Your feedback helps improve this site.
Yes
No
What’s your concern with this article?
Dissatisfied with product Too Complicated Confusing Title Does not apply to me Too Vague Other
We'd love to get your feedback, please let us know how we can improve this content.
Enviar
Thank you
Agradecemos o seu feedback.aqui para contatar nosso Suporte Técnico.

