How to set up IPv6 service for Cable ISP on the wireless router
Note: Please make sure that you are provided IPv6 internet service by your internet provider,If not, please contact with your IPv6 internet provider first.
Physical Connection
1. Power off your modem.
2. Connect the Internet port on your Router to the Modem’s LAN port with an Ethernet cable. If your Internet connection is through an Ethernet cable from the wall instead of through a DSL / Cable / Satellite modem, connect the Ethernet cable directly to the router’s Internet port.
3. Connect your computer to one of the ports labeled 1~4 on the Router with an Ethernet cable.
4. Power on the modem and wait for one minute.
5. Plug the provided Power Adapter into the Power jack and the other end to a standard electrical wall socket. Press the On/Off button to power on the Router.
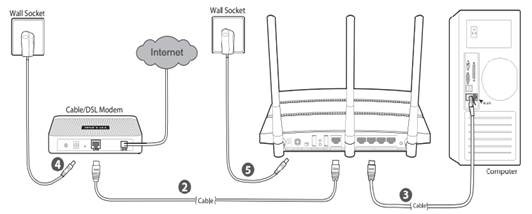
If you are still not sure how to connect the modem and the router, please refer to the QIG in the package.
Step 1
Log in to the router’s web-based management page, and please click here if you don’t know how to log in.
Step 2
Go to “IPv6” at the left hand side menu.
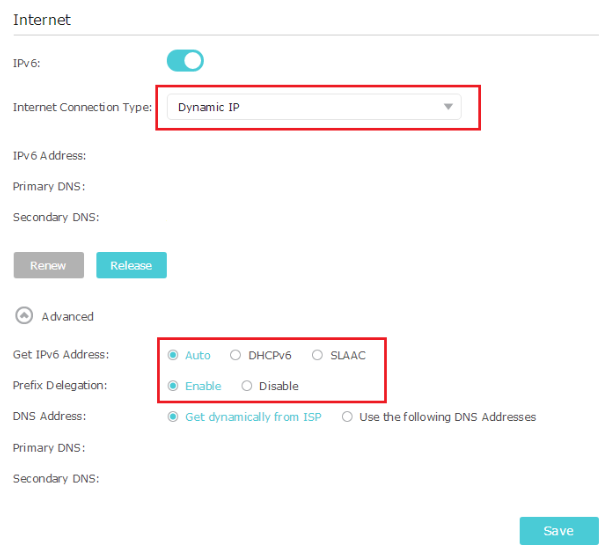
Step 3
Please make sure that IPv6 is enabled. Select “Dynamic IP” as Internet Connection Type.
Step4
Go to advanced option, select “Auto” in the “Get IPv6 Address”. Make sure “Prefix Delegation” is enabled.
Then click at “Save”.
If you tried above steps, and still no IPv6 internet, please contact with TP-Link Support.
Is this faq useful?
Your feedback helps improve this site.