How to Install My Kasa Smart Doorbell
Requirements:
- Existing doorbell: wired (not battery powered)
- Transformer: 16-24V AC, 10VA Minimum.
If you are not comfortable with basic electrical wiring, please consult a qualified electrician.
- Prepare the Tools
You might need a Philips head screwdriver, a flathead screwdriver, and pliers.

- (Optional) Install an SD Card
If you want to utilize 24/7 recording, please remove the two screws on the back of your Smart Doorbell and insert a microSD card.
Note: Without an SD card, you won’t be able to use 24/7 recording. If you decide to have one later, you’ll need to remove your doorbell to install the SD card.

- Check Existing Doorbell
Ring your doorbell; if it chimes, you’re good to go. If not, it’s best to have it fixed before proceeding.

- Locate Your Chime
If you don’t know where your chime is, ring the doorbell.
- Turn off power.

- Match Your Chime
Remove the chime cover. Check whether your chime is mechanical with two wires, mechanical with three wires, or an electronic / MP3 chime?


For Mechanical Chime with Two Wires

- Before you make any changes, take a picture of chime wiring in case you ever want to return to the old doorbell and chime.

- Loosen the two screws slightly and insert the jumper wire.

- Tighten the screws and replace the chime cover.
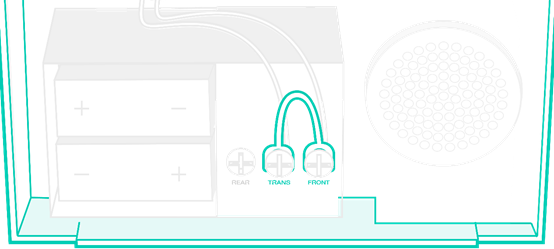
For Mechanical Chime with Three Wires

- Before you make any changes, take a picture of chime wiring in case you ever want to return to the old doorbell and chime.

- Install the jumper wire.
If you want to replace your front doorbell, loosen slightly the screws that correspond to Front and Trans and insert the jumper wire.

If you want to replace your rear doorbell, loosen slightly the screws that correspond to Rear and Trans and insert the jumper wire.

- Tighten the screws and replace the chime cover.
For Electronica or MP3 Chime

- Before you make any changes, take a picture of chime wiring in case you ever want to return to the old doorbell and chime.

- Install the jumper wire.
If you want to replace your front doorbell, loosen slightly the screws that correspond to Front and Trans and insert the jumper wire.
If you want to replace your rear doorbell, loosen slightly the screws that correspond to Rear and Trans and insert the jumper wire.

Note:
Electronic chimes vary greatly. If yours does not include Front/Trans/Rear, please consult an electrician to bypass your electronic chime.
- Tighten the screws and replace the chime cover.
Your doorbell button may have no visible screw, or one or more visible screws.
Carefully insert a flat-bladed screw driver between the doorbell escutcheon and the wall, and pull forward to remove. Disconnect the wires.
 OR
OR 
- Drill pilot holes.
Use the provided paper template to help you locate and drill screw holes for the wall plate. Make sure the screw holes are level.

- Angled wedge.
Depending on where your doorbell is located, you may want to use the optional 15° wedge to point the doorbell camera in a more desirable location.

- Install the wall plate.
Sandwich the wall plate and the wedge together (if you use a wedge) and thread the wires through the central hole. Affix the assembly to the wall using appropriate fasteners for your surface. Make sure the arrow icon is pointing up.

- Connect the wires.
Slide the wires over the screws on the back of your Smart Doorbell and tighten the screws.
Note that the positive and negative ends of wiring are not differentiated here.

- Affix the doorbell.
Tuck the wires in the hole for easy and secure mounting. Starting from the bottom, install the doorbell on the wall bracket. You will hear a click.

- Turn on power.
Check your handiwork by ringing your doorbell. The LED above the camera will also illuminate.

How to Remove the Doorbell?
If you want to remove the doorbell from the wall, use a pin to press the detaching button on top of the mounting plate.

To get to know more details of each function and configuration please go to Download Center to download the manual of your product.
Is this faq useful?
Your feedback helps improve this site.