How to configure individual WEP key for individual wireless client on TP-Link Wireless Router
This Article Applies to:
Step 1
Open the web browser and in the address bar type in: http://192.168.1.1 or http://192.168.0.1 or http://tplinklogin.net. Then press Enter.

Note:
The LAN IP changes by model. Please find it on the bottom label of the product.
Step 2
Type the username and password in the login page, the default username and password are both admin.
Step 3
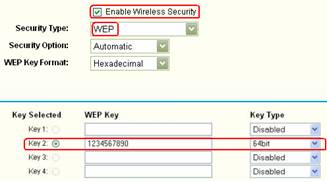
Click Wireless->Wireless Settings on left page, enable Wireless Security and select Security Type as WEP.
Note: Please select Key2 and configure the password.

Step 4
Click Save to save the settings.
Step 5
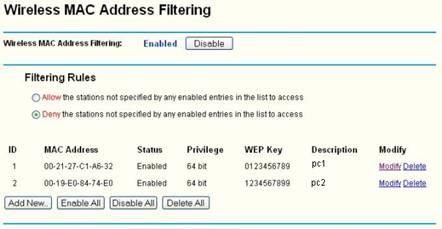
Click Wireless->MAC Filtering on left page, enable Wireless MAC Address Filtering and select the Filtering Rules as Deny the stations not specified by any enabled entries in the list to access. Click Add New to configure the detailed rule.

Step 6
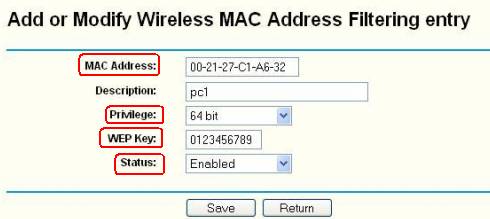
Input the wireless adapter’s MAC address which you would like to connect the wireless network with an individual password, select Privilege and configure WEP key. The key is just for the computer with the configured MAC address.

Step 7
Click Save to save settings.
Step 8
Click Add New to configure new password for other computers.
After setting different WEP keys for different computers, different passwords will be required when connecting to the wireless network. For example, we configure WEP key 0123456789 for pc1 and configure WEP key 1234567899 for pc2 as the screenshot below. When pc1 connects to the wireless network, it requires password 0123456789. When pc2 connects to the wireless network, it requires password 1234567899.

Get to know more details of each function and configuration please go to Download Center to download the manual of your product.
Is this faq useful?
Your feedback helps improve this site.