Bu Makalenin Geçerliliği:
Archer AC1900 , Archer C1200 , Archer C5400 , Archer AX12 , Archer C4 , Archer C5 , TL-WR843ND , Archer AX10 , Archer C2 , Archer AX95 , TL-WR842ND(RU) , Archer C59 (EU) , Archer AX96 , Archer AX23 (EU) , Archer C5v , Archer AX17 , Archer AX18 , Archer C6U , Archer AX15 , TL-WR940N , Archer BE850 , Archer C80 , Archer C58HP , Archer AXE95 , Archer AX53 (EU) , Archer C8 , Archer AX10000 , Archer C50 (W) , Archer C9 , Archer C6 , Archer C7 , Archer AX90 , TL-WR843N , Archer C5400X , Archer AX55(RU) , Archer AX5400 , Archer AX53 (RU) , Archer A20 , Archer C60 , Archer A1200 , Archer C64 , TL-WR820N , TL-WR941N , Archer AXE5400 , Archer AX73 (EU) , Archer AX5400 Pro , TL-WR941ND , Archer AX80 , TL-WR901N , TL-WR844N , Archer AX23 (RU) , Archer C59 , Archer C58 , Archer AX4200 , Archer C3200 , Archer A2 , Archer AX75 , Archer AX73 , Archer A10 , Archer AX55(EU) , Archer C50 , Archer C55 , Archer C54 , TL-WR841N , Archer BE550 , Archer AXE75 , Archer AX72 Pro , Archer A6 , Archer A7 , Archer AX72 , Archer A5 , TL-WR801N , Archer AX1450 , Archer A8 , Archer A9 , Archer AX68 , Archer AX5300 , Archer C4000 , Archer AX55 Pro , TL-WR902AC , Archer Air R5 , TL-WR842N , Archer AX1900 , TL-WR841HP , Archer AXE300 , Archer AX1500 , Archer AX60 , Archer AX73 (RU) , TL-WR802N , Archer AX73V , Archer AX3000 , Archer A2600 , Archer AX55 , TL-WR841ND , Archer C5200 , Archer AX53 , Archer AX51 , Archer A2200 , Archer BE650 , Archer C20(ISP) , Archer C3150 , Archer AX50 , Archer AX6000 , Archer C25 , Archer C24 , Archer A64 , Archer AX10/A , Archer C2600 , Archer C21 , Archer AX72 (RU) , Archer C20 , TL-WR840N , Archer A10 Pro , Archer AX1800 , Archer BE800 , Archer BE805 , Archer AX206 , TL-WR842ND , Archer C900 , Archer AX4400 , Archer C3000 , Archer C50 , TL-WR941HP , Archer A54 , Archer AX4800 , Archer C20(RU) , Archer C1900 , Archer A2300 , Archer C20i , Archer C2(RU) , Archer A2600 Pro , Archer AX55 (RU) , Archer AXE200 Omni , TL-WR845N , Archer GX90 , Archer C5 Pro , Archer C2(EU) , Archer C2300 , Archer C1210 , Archer AX23 , Archer AX3000 Pro , Archer AX20 , Archer C3150 V2 , Archer AX21 , Archer A3000 , Archer C2700 , Archer AX55 (EU) , Archer C86 , Archer C7i , Archer C90 , Archer C50(RU) , Archer Air E5 , Archer BE900 , Archer AX11000 , Archer GE800 , Archer AX3200 , TL-WR810N
There are two generations of Starlink Satellite Dish: The Gen-1 Terminal (Circular Dish) and the Gen-2 Terminal (Rectangular Dish). The main difference between the two versions is the removal of the Ethernet Jack. So with a Gen-2 Terminal, you must purchase an Ethernet Adapter from Starlink first to allow for a wired connection to the network.
Head below to learn how to connect the TP-Link router to the Starlink Terminal.
For the updated Gen-2 Starlink User Terminal
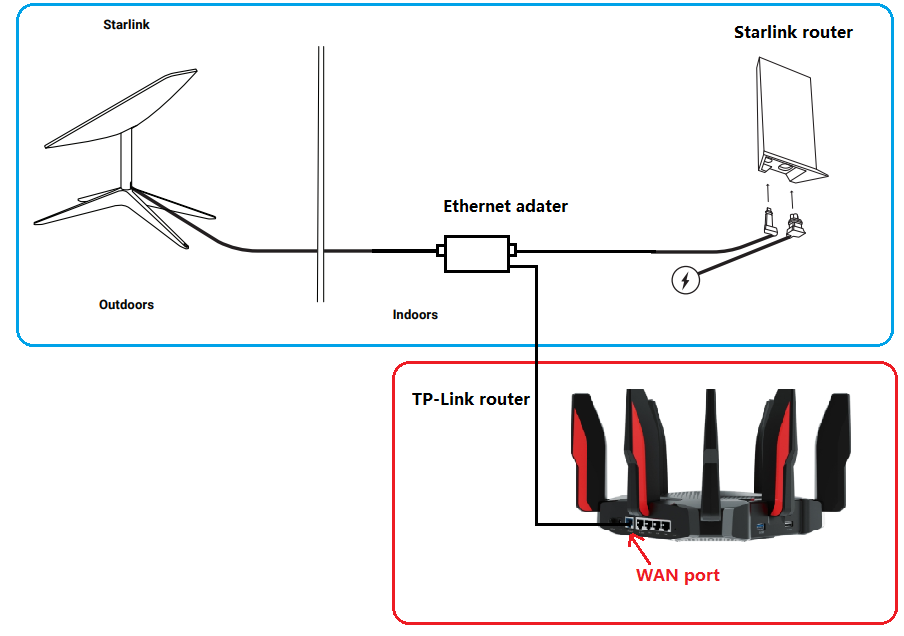
Unlike the Original Starlink Terminal, the Gen-2 Dish is Rectangular, and no PoE adapter is included. The Rectangular Dish will be directly powered by the Gen-2 Starlink router. Since there is no more Ethernet jack on the Gen-2 Starlink router, you must purchase an Ethernet Adapter from Starlink to Connect the TP-Link router.
- Connect the TP-Link router together with the Gen-2 Starlink router

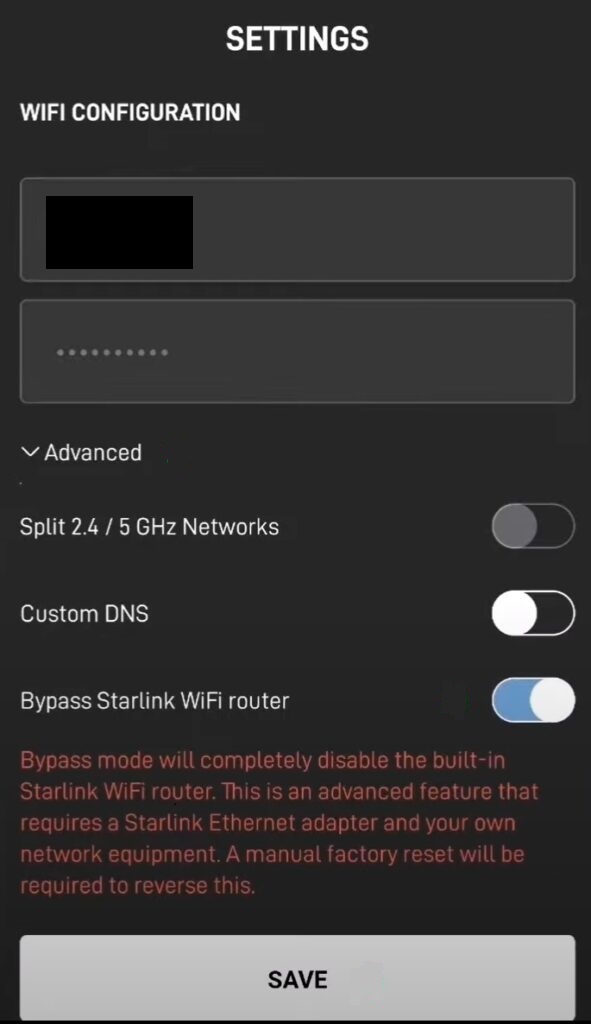
Gen-2 Starlink router supports Bypass mode that will completely disable the built-in Starlink WiFi router functionality. A factory reset is required if you want to switch back to router mode. So when the TP-Link router is connected to the Ethernet adapter, there are two recommended setups.
- Enable Bypass mode on Starlink APP under Settings > Advanced, then set up the TP-Link router in Wireless Router mode.

- Leave Bypass mode disabled on Starlink APP, then set up the TP-Link router in Access Point mode.
For the original Gen-1 Starlink User Terminal
- Connect the TP-Link router without the Gen-1 Starlink router

Go through this FAQ to set up the TP-Link router.
- Connect the TP-Link router together with Gen-1 Starlink router

On this network topology, please connect the TP-Link router to the AUX port of the Gen-1 Starlink Router. To avoid double NAT, it is suggested to change the TP-Link router into Access Point mode.
Follow this guide to change the TP-Link router into Access Point mode.
For any further inquiries about the TP-Link router setup or configuration with Starlink, please contact our technical support.


