Αυτό το άρθρο ισχύει για:
Archer VR900 , Archer C1200 , Archer C5400 , Archer C4 , Archer C5 , Archer VR2600v , Archer AX10 , Archer C2 , Archer AX96 , Archer C6U , Archer VR1200v , Archer C80 , Archer AXE95 , Archer C8 , Archer AX10000 , Archer C9 , Archer C6 , Archer C7 , Archer AX90 , Archer C5400X , Archer A20 , Archer C60 , Archer A1200 , Archer C64 , Archer VR400 , Archer C59 , Archer C58 , Archer AX4200 , Archer C3200 , Archer A2 , Archer AX75 , Archer AX73 , Archer A10 , Archer VR2100 , Archer C50 , Archer VR2800v , Archer VR600v , Archer C55 , Archer C54 , Archer AXE75 , Archer A6 , Archer A7 , Archer AX72 , Archer A5 , Archer A8 , Archer A9 , Archer AX68 , Archer AX5300 , Archer VR900v , Archer C4000 , Archer AXE300 , Archer AX1500 , Archer AX60 , Archer AX3000 , Archer A2600 , Archer AX55 , Archer C5200 , Archer AX53 , Archer AX51 , Archer C50 V3.0 , Archer VR400v , Archer A2200 , Archer VR2800 , TD-W9960v , Archer C3150 , Archer AX50 , Archer C20 V4 , Archer VR900v v1 , Archer AX6000 , Archer C25 , Archer C24 , Archer A64 , Archer C2 V1 , Archer VR900 v1 , Archer AX10/A , Archer C2600 , Archer C21 , Archer C20 , Archer C2 V3 , Archer A10 Pro , Archer AX1800 , Archer VR200 , Archer VR600 , Archer AX206 , Archer C900 , Archer AX4400 , Archer C3000 , Archer C50 , Archer A54 , Archer AX4800 , Archer C1900 , Archer A2300 , Archer A2600 Pro , Archer C5 v4.0 , Archer AXE200 Omni , Archer GX90 , Archer C5 Pro , Archer C2(EU) , Archer C2300 , Archer AX23 , Archer AX20 , Archer VR2100v , Archer AX21 , Archer A3000 , Archer C2700 , Archer C90 , Archer AX11000 , Archer AX3200
This Guide will show you how to change the DNS address in your TP-Link wireless router on our newest UI.
For Wireless Router (Blue GUI)
Step 1: using any web browser such as IE, Firefox or Google Chrome log into the router.
Step 2: Log in to the router. The default username and password is “admin”.
Step 3: Click on “Advanced”, then “Network”, then “Internet”.
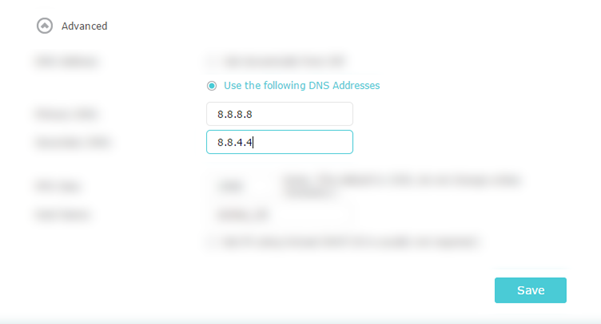
Step 4: Click the drop-down for “Advanced”, then click the radio for “Use the following DNS address”. Input your DNS addresses then click “Save”.
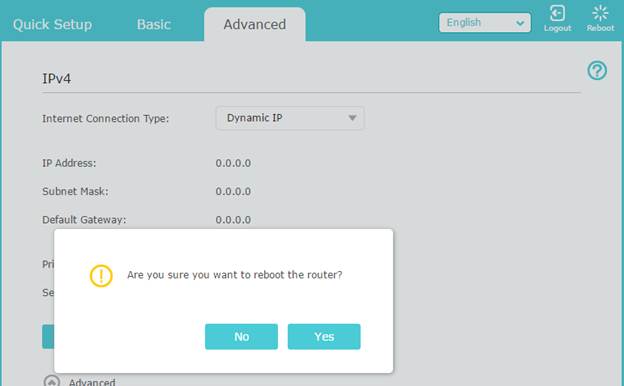
Step 5: Click “Reboot” in the upper right corner, then on the pop up click “Yes”.
For DSL modem router(Take Archer VR600 as an example) :
Step1: Login to the web page following the FAQ : How to log into the web-based interface of the AC VDSL/ADSL Modem Router (new logo)?
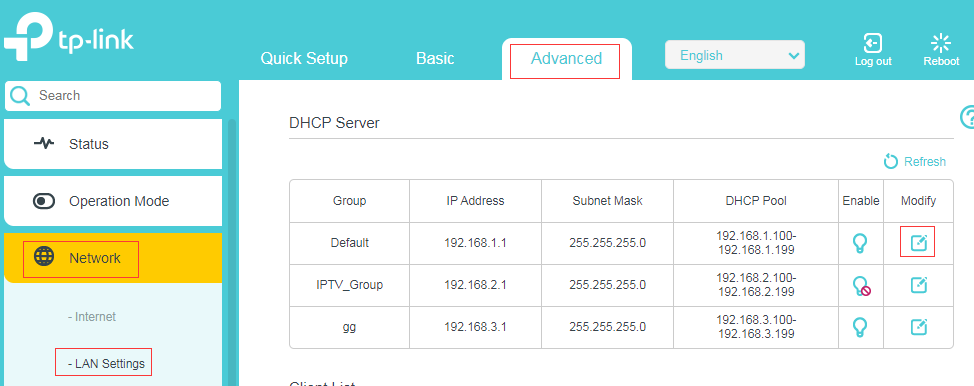
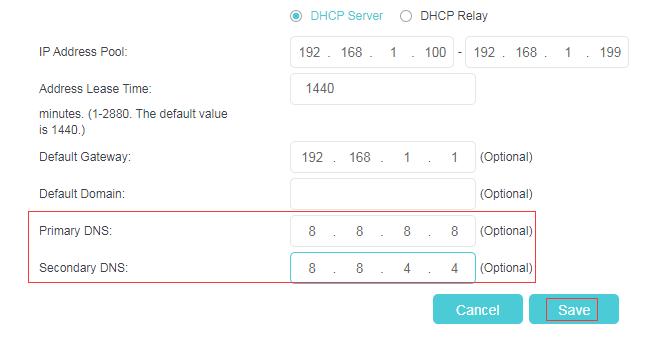
Step 2: Go to Advanced >> Network >> LAN Settings, click on the Modify, then you can change the DNS to one what you need and reboot the modem router.
To get to know more details of each function and configuration please go to Download Center to download the manual of your product.
Είναι χρήσιμο αυτό το FAQ;
Τα σχόλιά σας συμβάλλουν στη βελτίωση αυτού του ιστότοπου.
Ναι
Όχι
What’s your concern with this article?
Dissatisfied with product Too Complicated Confusing Title Does not apply to me Too Vague Other
Πώς μπορούμε να το βελτιώσουμε;
Υποβολή
Σας Ευχαριστούμε
Εκτιμούμε τα σχόλιά σας.εδώ για να επικοινωνήσετε με την τεχνική υποστήριξη TP-Link.
 -or-
-or- 


