How to Upgrade TP-Link Wireless Access Point/Range Extender
This Article Applies to:
Notice:
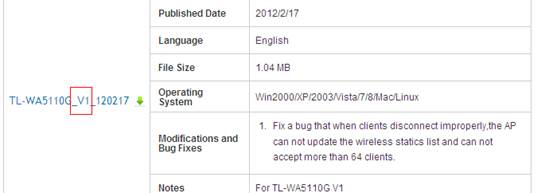
1 )Please verify the hardware version of your device for the firmware version.Wrong firmware upgrading may damage your device and void the warranty.
For how to check the hardware version of the device please click refer to article/?faqid=46 .


2) After you download the firmware from TP-Link website, please use unzip tools such as WinZIP or WinRAR to extract the firmware file to a folder;
3) It’s recommended to upgrade the firmware via cable connection unless the TP-Link device only has wireless connection, like TL-WA854RE.
4) Do NOT turn off the power or cut down the Ethernet cable during upgrade process;
5) After upgrading all settings will revert to factory defaults, so you may save current settings in advance.
Step 1 log in the web interface:
1)For old versions, DHCP is disabled by default,please refer to article/?faqid=174 to log in the web interface.
2)For new versions( If you just purchased the device it probably the new versions ) please input 192.168.0.254 to log in the web interface directly.
Note: Default access address can be found on the label of the device.

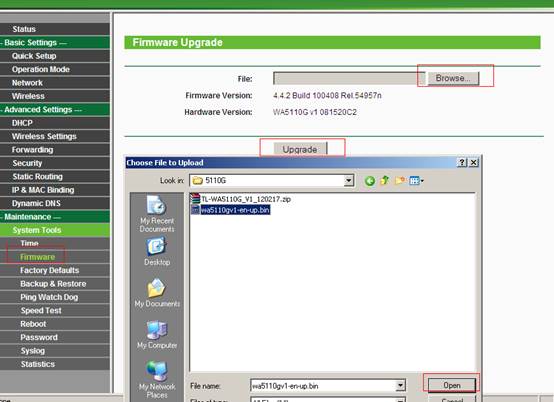
Step 2 Click on System Tools---Firmware Upgrade( or Firmware); click on Browse to find the extracted firmware.
Step 3 Click on Upgrade button. The device will reboot automatically after the
upgrading has been finished. 

Step 4 Click Status, verify that the firmware has been upgraded.


Step 5 It is recommended to restore the device to factory default to make sure the new usage takes effect; Click System Tools->Factory Defaults,Click Restore Button.

Step 6 After the factory defaults, please reconfigure the device from scratch.
Is this faq useful?
Your feedback helps improve this site.