How to Setup MAC Binding on a TP-Link Router (Blue UI)
Configuration Guide
Updated 07-08-2021 02:19:00 AM
 102974
This Article Applies to:
Archer C2(EU)( V3 ) , Archer C59( V1 ) , Archer C1200( V1 ) , Archer C5400( V1 ) , Archer C58( V1 ) , Archer C25( V3 ) , Archer C3200( V1 ) , Archer C5( V2 ) , Touch P5( V1 ) , Archer C2( V3 ) , Archer C50( V2 ) , Archer C1900( V1 ) , Archer C60( V1 ) , Archer C2600( V1 ) , Archer C8( V2 ) , Archer C3150( V1 ) , Archer C9( V2 V3 ) , AD7200( V1 )
Step 1: Log into the Router
How do I log into the web-based Utility (Management Page) of TP-Link wireless router?
Step 2: Click Advance

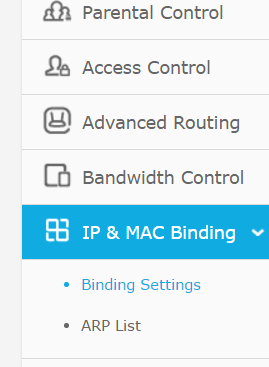
Step 3: Click on IP and MAC Binding

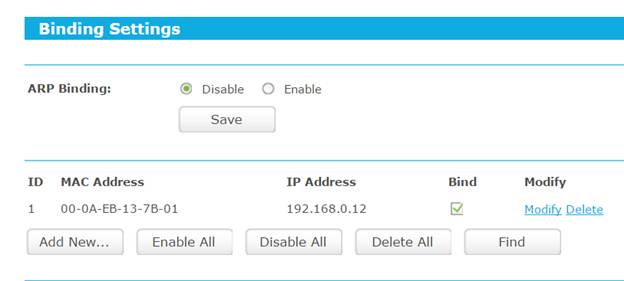
Step 4: Enable ARP Binding then click Save, then click Add new

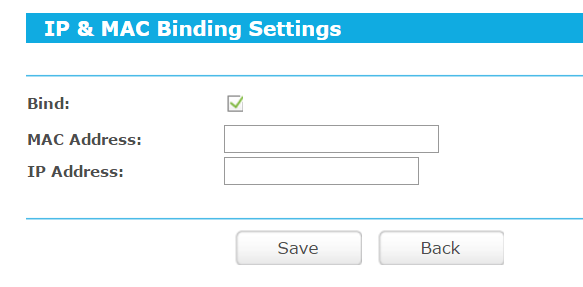
Step 5: Input the MAC and IP Address of the device you want to bind and click Save

*Ensure Bind is checked
Is this faq useful?
Your feedback helps improve this site.
What’s your concern with this article?
- Dissatisfied with product
- Too Complicated
- Confusing Title
- Does not apply to me
- Too Vague
- Other
We'd love to get your feedback, please let us know how we can improve this content.
Thank you
We appreciate your feedback.
Click here to contact TP-Link technical support.


