How to create static routes on TD-W9960?
A static route is a pre-determined path that network information must travel to reach a specific host or network. Data from one point to another will always follow the same path regardless of other considerations. Normal internet usage does not require this setting to be configured.
I want to: Visit multiple networks and multiple servers at the same time.
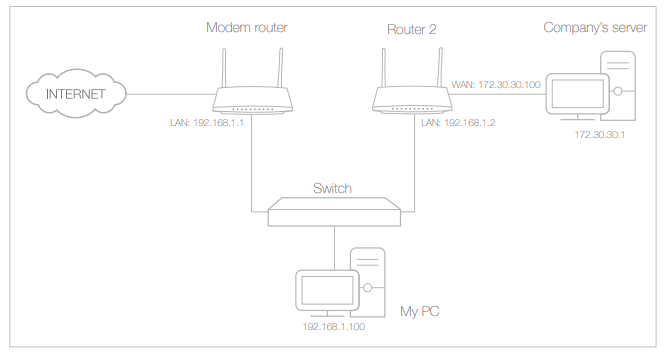
For example, in a small office, my PC can surf the internet, but I also want to visit my company’s server. Now I have a switch and another router. I connect the devices as shown in the following figure so that the physical connection between my PC and my company’s server is achieved. To surf the internet and visit my company’s network at the same time, I need to configure the static routing.

1. Make sure the routers use different LAN IP addresses on the same subnet. Disable Router 2’s DHCP function.
2. Log in the web interface of the modem router. You can refer to How to login to the web management page of TD-W9960
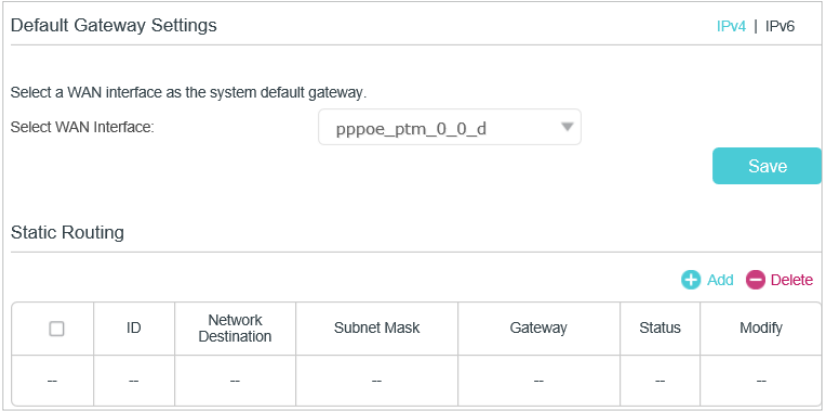
3. Go to Advanced > Network > Static Routing. Select your current WAN Interface and click Save.

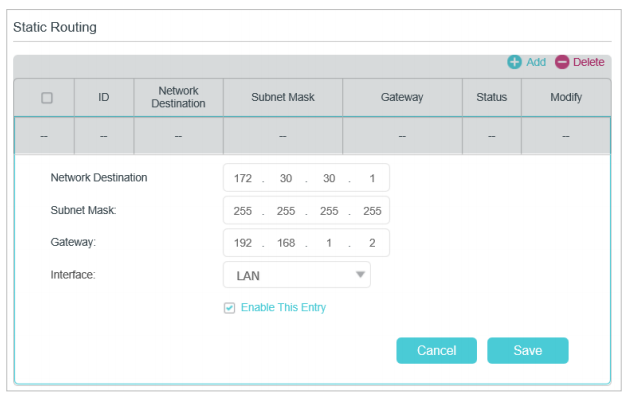
4. Click Add to add a new static routing entry. Finish the settings according to the following explanations:

Network Destination: The destination IP address that you want to assign to a static route. This IP address cannot be on the same subnet with the WAN IP or LAN IP of the router. In the example, the IP address of the company network is the destination IP address, so here enters 172.30.30.1.
Subnet Mask: Determines the destination network with the destination IP address. If the destination is a single IP address, enter 255.255.255.255; otherwise, enter the subnet mask of the corresponding network IP. In the example, the destination network is a single IP, so here enters 255.255.255.255.
Gateway: The IP address of the gateway device to which the data packets will be sent. This IP address must be on the same subnet with the router’s IP which sends out the data. In the example, the data packets will be sent to the LAN port of Router 2 and then to the Server, so the default gateway should be 192.168.1.2.
Interface: Determined by the port (WAN/LAN) that sends out the data packets. In the example, the data is sent to the gateway through the LAN port, so LAN should be selected.
5. Select the check box to enable this entry.
6. Click OK to save the settings.
Open a web browser on your PC. Enter the company server’s IP address to visit the company network.
Get to know more details of each function and configuration please go to Download Center to download the manual of your product.
¿Es útil esta pregunta frecuente?
Sus comentarios nos ayudan a mejorar este sitio.